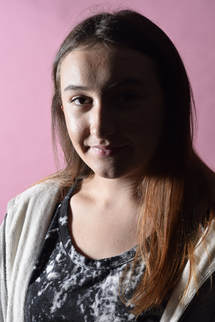
 Short Split Lighting Equipment needed: •Beauty Dish with diffuser •750 light source •Pink backdrop •DSLR with 50mm fixed lens This lighting set up created a split lighting style. The use of soft lighting enables the light to wrap around the subject, giving diffused shadows and soft edges. The transition from light to dark is graduated. The short lighting is useful for round faces which you want to appear longer and more slender. This also helps to add drama to the subject. It is recognized by the way the far side of the model is illuminated while the near side is in shadow.  Broad Split Lighting Equipment needed: •Beauty Dish with diffuser •750 light source •Pink backdrop •DSLR with 50mm fixed lens Here, the split lighting is created again. This lighting is much more flattering for portraiture compared to hard lighting which is very harsh. I attempted broad lighting here, which is the opposite to short. It eliminates the problem of thin faces looking too slim with short lighting. This lighting is also useful for hiding features in the shadows which you do not want to be seen. 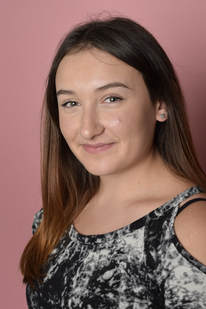 Gold Tri Reflector Equipment needed: •Large soft box •750 light source •Pink backdrop •DSLR with 50mm fixed lens •Gold tri reflector I used a large soft box here and had it directly in front of my model to fully illuminate her. This light was very bright but soft and flattering for my model. I tested out using a gold tri reflector which can be angled at my model from any direction without the aid of an assistant. This created a subtle flattering warm light onto my model which adds a nice flush of colour. 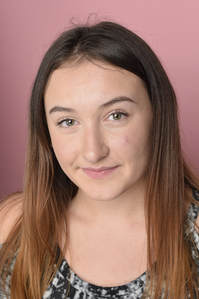 Silver Tri Reflector
Equipment needed: •Large soft box •750 light source •Pink backdrop •DSLR with 50mm fixed lens •Silver Tri reflector • Here, I kept my set up the same, but I changed the reflector. Instead of using the gold reflector, I wanted to see what effect the silver reflector gave instead, to see which one I preferred. The silver gave a brighter look to my photographs. It helped to illuminate my subject more with a whiter light.
0 Comments
 Equipment needed: •High performance reflector X 2 •750 watt light source X 2 •Orange colour gel •Pink colour gel •Canon 7D DSLR with triggers •15-85mm lens •White backdrop This lighting set up created a pretty, bright look to my photographs. The colours I was using created a nice variety of coloured highlights over my subject. Both colours are evenly evident. The lighting was flattering for my model and her skin tone. I like the fun, playful aspect that this coloured lighting combination created. 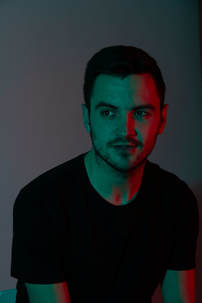 Equipment needed: •High performance reflector X 2 •750 watt light source X 2 •Blue colour gel •Red colour gel •Canon 7D DSLR with triggers •15-85mm lens •White backdrop A much darker, more serious mood was created with this colour combination. As I knew the lighting would be much harsher and darker, I thought it would work better with a male model. The blue light casts the majority of the light but the red adds in a bright contrast of colour which I really like. It helps to change the mood of the image. It also works perfectly with my model.  Equipment needed: •High performance reflector X 2 •750 watt light source X 2 •Yellow colour gel •Green colour gel •Canon 7D DSLR with triggers •15-85mm lens •White backdrop The end result from this colour gel choice was much less vibrant than the pink and orange. The lighting was more muted, but still very evident. I do not think that these colours worked as well as others due to the cool tones washing out my subject, and not being as flattering for her. However, due to her positioning, I like how the green almost works as the shadow for the yellow. 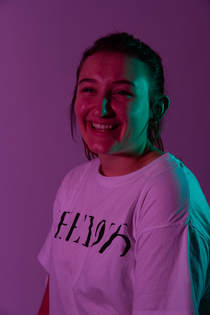 Equipment needed:
•High performance reflector X 2 •750 watt light source X 2 •Pink colour gel •Blue colour gel •Canon 7D DSLR with triggers •15-85mm lens •White backdrop I had found inspiration from this colour combination on Pinterest on a high fashion style image so wanted to test it out myself. These colours are very commonly used together for fashion photography. I liked the way that this turned out as it set a calming mood with the pink lights, and added a pop of blue for the highlights of the image. |
About me
I am currently undergoing a Creative Arts & Design Practise (Top-Up) course. This blog contains tutorials and advice when creating digital images and editing using Photoshop. Archives
April 2021
Categories |
 RSS Feed
